English – Bengali Dictionary v2.0 for Android phones released

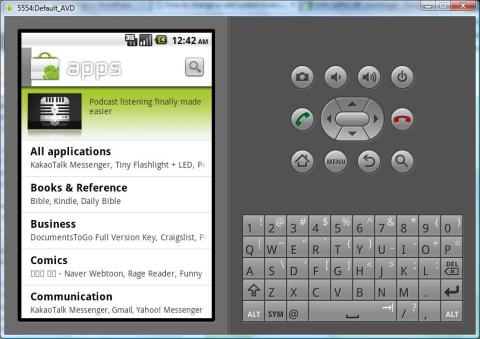
I’m happy to release the second version of my Android application English to Bengali Dictionary v2.0. You can download the installer here. Major changes in this release is listed below.

  1. Use this dictionary Offline.
  2. Access Barron’s GRE word list in a separate list view.
  3. Auto completion suggestions while you type words.
  4. Suggestions of word list if exact match of word is not found in the dictionary.
  5. Also there are other enhancements.

How to use this dictionary offline:

  1. Download word meaning images.
  2. Extract them in your mobile phone’s SD card. You may create a directory e2b in your SD card and place all contents of the zip file in that directory. In this case make sure that the directory e2b contains different folders ‘A’, ‘B’, ‘C’ etc in it.
  3. Press Menu button and open Settings and enable offline use option
  4. Edit offline data location. You will need to change this value based on the location where you have extracted word meaning images. If you have extracted the contents in e2b directory then change this value to e2b and save. Default value for offline data location is set to .weaverspark/e2b.

How to see Barron’s GRE word list:

  • Choose Menu > Barron’s GRE.
  • Expand the alphabet for which you want to see GRE words

Thanks in advance for using my application.

..
Comments (42)

How to change or add system fonts in android emulator

I wanted to install Bengali fonts in my Android device. I tried different ways to add Bengali font support in my Android device. And finally I ended up with fonts installed in Android emulator.

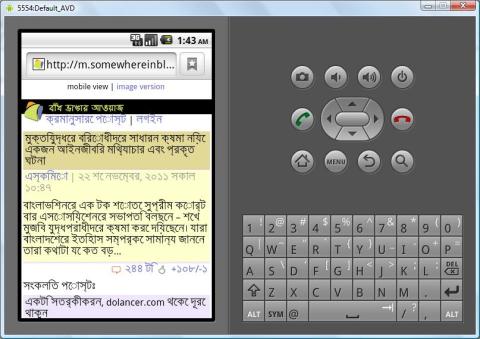
Android emulator with Bengali fonts

I followed different blogs where many people explained how to add system fonts in android devices. Some people say that we can install system fonts without rooting the device. On the other hand there are people who believes that the android device must be rooted to make changes to system fonts. I believe that the device must be rooted. Because all my attempts were unsuccessful with my un-rooted device.

Finally, I decided to install or change system font of Android emulator. I could replace system fonts using adb shell. But the problem was that the changes were not persistent. That is, system files are restored when the emulator is restarted. And that was a new challenge on my way. Please find the steps below that I followed to overcome this new challenge.

Note that we need a linux PC to execute the following steps.

  1. Extract system.img using uyaffs. You will find system.img in your ‘SDK_INSTALLATION_DIR/platforms/android-2.2/images/’ directory. Download the file unyaffs2 and change permission to add execute support. Now create a new folder where you want to extract all contents of system.img. Go to that folder and extract contents using the command ‘./some/path/to/unyaffs /another/path/to/system.img’. This will extract all contents in the current folder.
  2. Add or modify contents in corresponding locations. I replaced /system/fonts/DroidSansFallback.ttf with SiyamRupali.ttf (or SolaimanLipi.ttf) to add Bengali font support. Since I wanted to install Android Market application in the emulator I did edit /system/build.prop file (added # at the start of the text ‘ro.config.nocheckin=yes’). Also I followed necessary steps to install Android Market application in emulator here. Though this did not work for me, I would request you to read those steps.
  3. Re-pack system.img using mkfs.yaffs2.x86. You may download mkfs.yaffs2.x86 from here or here if the first link is not reachable. But I did not test those. The command to pack contents will be something similar to ‘./some/path/to/mkfs.yaffs2.x86 /your/image/dir/ /your/newimage/path/newimage.img’
  4. Now that you have created a modified version of system.img its time to run avd using that new image. Copy newimage.img to Android SDK installation location from where you copied system.img earlier to extract. Rename existing system.img to system.img.orig. Now rename newimage.img to system.img. Start avd and check if everything is OK.

Android Market in emulator SDK 2.2

Comments (2)

Right click, copy, paste not working in Flex?

Clipboard menu items of text input controls (TextInput, TextArea etc) under a TitleWindow were not working when we display that window as a popup.

After investigation we found that the problem is in flex.

To fix this,

1. In TitleWindow component mouseEnabled property should be true.
2. Also the mouseEnabled property should be true for TitleWindow‘s skin.

Enjoy coding !

Comments (1)

AppleUSBCDCACM driver patched for Qualcomm Gobi mobile broadband device

Please NOTE: Download and Install Firmware Uploader first.

After successful installation of Mac OS X 10.6.7 in my Toshiba M505-s4945 I was trying to compile AirPrime USB modem device driver that I modified earlier for Mac OS X 10.5.x installation. I could compile, install and load this driver successfully. But this would cause my built-in Toshiba mobile broadband device (Qualcomm Gobi) to hang. Since then, I was trying to find out any workaround and/or possible solution to this problem.

At first I tried to modify Info.plist of AppleUSBCDCACMData.kext to match my device and load. Though the device were matched and the KEXT were trying to start the USB device but it failed. Then I downloaded the source codes of AppleUSBCDC device driver dig more and was trying to figure out the problem.

Finally, I could come up with a patch where I just had to bypassed a snippet of code of AppleUSBCDCACMData driver. In that section of code the driver just checks or cross verifies the device Class, SubClass and Protocol.

You can dowload or view the diff/patch file, apply the patch and compile based on your version of AppleUSBCDC driver.

Installation instruction:
1. Download the KEXT file from the following location if you are on Mac OS X 10.6.7.

a. AppleUSBCDCACMData.kext_x64.zip
b. AppleUSBCDCACMData.kext_x86.zip

2. Modify devide id (idProduct) in Info.plist of this KEXT. This id should match your modem device id that you see after uploading the firmware. My device id is 4878 (0x130e) after uploading the firmware. You can download the firmware up-loader that I have developed if you do not have it already.

3. Replace existing AppleUSBCDCACMData.kext in S/L/E/IOUSBFamily.kext/Contents/PlugIns/.

4. Repair permissions for AppleUSBCDCACMData.kext.

5. Restart (not mandatory I guess).

Enjoy !

.

Comments (22)

Qualcomm Gobi firmware uploader for Mac OS X

If you have a built-in Qualcomm Gobi mobile broadband device in your notebook/netbook then you are in the right place.

How to:

1. Download the firmware up-loader if your laptop is Toshiba Satellite M505-s4945. Otherwise you can Download source code of the firmware up-loader. Then change the device ID and vendor ID in the source code and build your own firmware up-loader.

2. Create a directory ‘USBNotificationExample’ in ‘/Library/Application Support/’ or ‘/Library/Application Support/’

3. Copy firmware image files that is appropriate for your mobile operator (amss.mbn and apps.mbn) in that directory. You will get those image files if you have installed WWAN Connection Manager in windows.

4. Run the application downloaded. This will upload the firmware image files to the device.

5. Install the modem device driver that I have patched for Qualcomm Gobi.

.

Comments (5)

How to send DateTime input parameter for Web Services or QaaWS using .NET C#

When we talk about Web Services then it is obvious that there is a chance where the Web Service is hosted in different geographical location than its clients. Web service hosted in a server with different timezone from its client may not return expected data if the DateTime input parameter is not properly configured/set.

Let us assume that we are trying to access a web service which is hosted in a server with different timezone as we are in. Also the service we are trying to access requires us to send input parameters of type DateTime and based on that input values server will return us some data. In my case I was trying to access a QaaWS (Query as a Web Service) service from Bangladesh (locale en_US, timezone +6 hrs) hosted in a server in Netherlands (locale nl_NL, timezone: +1 hrs) that expects two date values as input parameters along with some other parameters.

In this case to retrieve expected data from the Web Service or QaaWS service we must send the data time parameter values in the format based on our locale. So that, the server that receives that date value can convert the value based on its own timezone.

DateTime instances in C# .NET has a Kind field that indicates whether the time value is based on local time, Coordinated Universal Time (UTC), or neither. So to retrieve expected data from the Web Service we must change its kind to DateTimeKind.Local.

You can visit this for more information on DateTime.SpecifyKind().

In my case I was to send a date range for which I wanted to retrieve data. The c# code that I used to is give below.

// other codes above
DateTime fromDate = new DateTime(fromYear, fromMonth, fromDay, 0, 0, 0, 001, DateTimeKind.Local);
DateTime toDate = new DateTime(toYear, toMonth, toDay, 23, 59, 59, 999, DateTimeKind.Local);

Rows[] rows = ws.runQueryAsAService(username, password, fromDate, toDate, other, params, here);
// Other codes continued....

Leave a Comment

View ‘Market price’ from DSE BULL! Tray in Firefox

Dear DSE BULL! Tray user, you might be thinking why is the ‘Market Price’ shortcut URI is not working from DSE BULL! Tray. Actually dsebd.org is not allowing outsiders to access this resource. After my investigation on this issue I have found a workaround to view Market Price in my Firefox browser.

Please let us know if we can change referrer in other browsers too as explained below using RefControl plugin for Firefox

Follow the steps given below:

1. Download and Install Firefox if you do not have it already installed. And make Firefox as default browser.
2. Install ‘RefControl’ Firefox plugin. Please visit https://addons.mozilla.org/en-us/firefox/addon/refcontrol/ to install this plugin. Restart Firefox when asked after installation of this plugin.
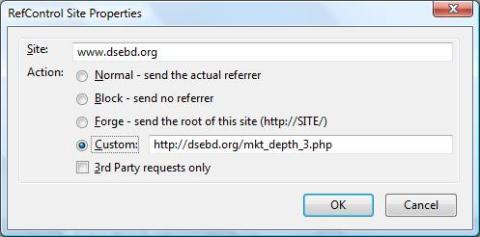
3. Click Tools > ‘RefControl Options…’ to open RefContro Options window in Firefox. Click ‘Add Site’ button to open RefControl Site Properties window. Now enter ‘www.dsebd.org’ in site field, choose ‘Custom’ action and enter ‘http://dsebd.org/mkt_depth_3.php’ as shown in the screen-shot below. Click OK to close RefControl Site Properties window. Click OK again to close ‘RefControl Options’ window.

RefControl Site Properties

4. Now you are ready to view ‘Market Price’ from DSE BULL! Tray. Run DSE BULL! Tray if it is not running already. Right click any item and choose ‘Market Price…’ to view Market Price of DSE website.

Leave a Comment

2010 in review

The stats helper monkeys at WordPress.com mulled over how this blog did in 2010, and here’s a high level summary of its overall blog health:

Healthy blog!

The Blog-Health-o-Meter™ reads Wow.

Crunchy numbers

Featured image

A helper monkey made this abstract painting, inspired by your stats.

The average container ship can carry about 4,500 containers. This blog was viewed about 17,000 times in 2010. If each view were a shipping container, your blog would have filled about 4 fully loaded ships.

In 2010, there were 2 new posts, growing the total archive of this blog to 12 posts. There were 7 pictures uploaded, taking up a total of 256kb.

The busiest day of the year was November 11th with 435 views. The most popular post that day was DSE BULL! Tray.

Where did they come from?

The top referring sites in 2010 were somewhereinblog.net, weaverspark.com, facebook.com, google.com, and search.conduit.com.

Some visitors came searching, mostly for english to bangla dictionary for mobile, dse bull, english to bengali dictionary for mobile, dse bull tray, and bangla dictionary for mobile.

Attractions in 2010

These are the posts and pages that got the most views in 2010.

1

DSE BULL! Tray March 2010
63 comments

2

English to Bengali dictionary for mobile January 2009
177 comments

3

Download Yahoo Go or Gmail (YahooGo.jar/Gmail.jar) using Firefox 3.0 October 2008
14 comments

4

DSE BULL! January 2010
13 comments

5

Activate/Unlock Qualcomm Gobi Mobile Broadband device April 2010
2 comments

Leave a Comment

Qualcomm Gobi Mobile Broadband device Driver for Mac OS X

Please check my latest blog post for device driver

After two weeks of restless work I could manage to develop Mac OS X device driver and firmware loader for vendor specific usb device (Qualcomm Gobi Mobile Broadband device).

qcserial USB driver for linux directed me to the right direction. First of all, I was trying to upload firmware to the USB device after making some changes to SimpleUSBNotification example shipped with XCode. I had to port the codes of for Mac OS X.

Though I could upload the firmware after few days of work the device were not working as I expected. Because, the device and all its interfaces (class, subclass, protocol) were defined as vendor-specific. As a result none of the existing usb modem driver were recognizing it.

Then I was planning to develop a driver for this. My target was to expose a vendor-specific USB Interface (Interface #2) of the Composite USB device to be exposed as a port under /dev/tty.* using the driver and then use that port to connect dial-up internet.

Then I found a usb modem driver called AirPrime. I have been trying to modify this driver so that the modified source codes work for my usb device. And finally the success came to me. I could load the driver during boot which do recognize my usb device after uploading the firmware and then I can connect internet without any problem

Please let me know if you want me to upload the modified source codes. Thanks for your time.

Comments (6)

Activate/Unlock Qualcomm Gobi Mobile Broadband device

I was lucky enough to activate Qualcomm Gobi Mobile Broadband device built-in with Toshiba Satellite M505-S4945. It is now working with GSM network (GrameenPhone/Aktel/Warid) in Bangladesh. I could not test it with CDMA network available here. Loading appropriate firmware should work, I hope.

Please follow the steps below.
1. Load Gobi Firmware onto the device using Toshiba WWAN Connection Manager on Toshiba Mobile Broadband Device.

2. Execute AT+CFUN=1 AT command on the device (****Please do this at your own risk****). I used minicom to connect to the device and execute AT command in Linux environment. Please use similar applications available in Windows platform.

3. The command above will unlock the device. Now configure WWAN Connection Manager for your network and enjoy.

The way I made it work:
1. Uninstall Qualcomm Gobi Download Service.
2. Install Ubuntu 9.10 in virtualbox 3.1.4.
3. Installed qcserial, the device driver for Qualcomm Gobi. Please check this. FYI, I added the following text to the driver code.
{USB_DEVICE(0x0930, 0x130D)}, /* Toshiba Gobi QDL device */
{USB_DEVICE(0x0930, 0x130E)}, /* Toshiba Gobi Modem device */

4. Load Gobi Firmware. You can load any firmware. Check this to load firmware. Please note that the blue light will be turned off automatically once the firmware is loaded.
5. Install and use minicom to execute “AT+CFUN=1” AT command to activate the device. If the device is activated the blue light will be turned on again.
6. Once the device is activated re-install 3g drivers and utility software uninstalled earlier in your Windows platform and enjoy.

I am now experiencing Gobi in Windows Vista Home Premium.

Comments (3)

Older Posts »